Watching my WAN with OpenWRT
January 2, 2017
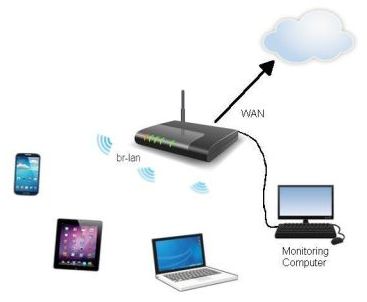
Since I started working with OpenWRT a few years ago, one thing I've always been curious about is seeing what kind of uninvited traffic I am getting on the internet (WAN, or Wide Area Network) side of my router. The WAN side of a router is like your front-door, and I think it's a natural thing to wonder who is there fiddling with the lock. Sadly most people don't have the technical knowledge to even set this kind of thing up, let alone decipher the traffic. I am slowly getting to the point where I can do this, and I'll lay out a few approaches to setting up this kind of traffic monitor.
A common approach you find people talk about is to alter your firewall so that packets are mirrored to another machine. While this works, I'm not a big fan of this method, primarily because the router firewall is so important to your local network. Nearly all the computers on my LAN do not have their own firewall, so the router firewall is the only thing standing between each of them and some very ugly things on the internet. Firewalls are complex, despite what the whiz-kid down the street tells you, and if you muck up your router firewall it can be difficult to diagnose and correct. Fortunately there are other ways to obtain the WAN traffic.
TcpDump and Netcat
The idea here is somehow direct a copy of your WAN packets to a secondary machine. While modern consumer-grade routers are fairly robust, they are still nowhere near as powerful as a full-power desktop or laptop machine, so it's advisable to perform analysis and collection of data on one of these. TcpDump is a great tool for dumping (to StdOut, or a console terminal) a copy of your packet stream on a particular interface. In the Linux world they call this a "Tee" because it makes a duplicate without interrupting the original stream. The other utility I use is called Netcat, which does nothing except move data from one network endpoint to another. With these two tools, you can mirror data from your router's WAN interface to another computer.
OpenWRT may have some built-in functionality for Netcat, but I went ahead and installed everything from package repositories. From an OpenWRT command-line, the following commands will install everything needed.
> opkg update
> opkg install netcat
> opkg install tcpdump
I can also look at the interfaces on my OpenWRT device and learn their IP addresses using the ifconfig command.
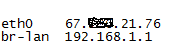
From experience I know the br-lan interface (bridged-lan) is the set of connections allowing my wired and wireless devices to connect to my router. The other interface eth0 is the WAN, or the internet side of the router. If you run the following command at an OpenWRT terminal, it will dump all your WAN traffic to the screen (until you hit ctrl-c). The command options listed there are basically to optimize for speed and efficiency, and to perform the raw packet dump to the StdOut terminal interface.
> tcpdump -s 0 -U -n -w - -i eth0
If my monitoring computer is on 192.168.1.204 and I wish to receive the data on port 61000, then I would run this command from OpenWRT, which pipes the output from tcpdump into the netcat utility which will then transfer the data over to the other machine.
> tcpdump -s 0 -U -n -w - -i eth0 | netcat 192.168.1.204 61000
On the monitoring computer, you would receive the data with a command like this, which uses the netcat -l or listen option.
> netcat -l -p 61000
On the monitoring computer, to pipe the data into the wireshark program for analysis, the command becomes this.
> netcat -l -p 61000 | wireshark -k -i - &
The only real gotcha is that you have a TCP connection between OpenWRT and your monitoring computer, so the endpoint has to be listening first, and then after that you can run the command to mirror the WAN data. This ordering might not be important if we sent the Netcat data using UDP, since it is connectionless, but we used TCP so the order is important (literally Netcat will stop running without a TCP endpoint to connect to). So the correct order to run these is as follows:
- Run on monitoring computer first: netcat -l -p 61000 | wireshark -k -i - &
- Run on OpenWRT router second: tcpdump -s 0 -U -n -w - -i eth0 not port 22 | netcat 192.168.1.204 61000
Of course this example assumes you have both netcat and wireshark available on the monitoring computer, which would be the case for Kali Linux in a default setup. This approach works great, but it's a little clunky when you're pressed for time. Also be aware that Netcat does not provide any encryption security, in case that's an issue. Next I'll show an approach using a single-line command from the monitoring computer.
SSH, the Secure Shell
This approach uses the SSH utility to connect between the monitoring computer and OpenWRT router, and it has some advantages over the TcpDump/Netcat approach, but it does require a slight bit of setup. All the activity in this section takes place in the monitoring computer. Also assume that my gateway, the OpenWRT router, has IP address 192.168.1.1 when viewed from any device on my LAN. You should initially connect to OpenWRT using SSH to establish the RSA fingerprint. SSH will ask you for your OpenWRT password and whether you trust the connection.
> ssh root@192.168.1.1
SSH offers extreme security by the use of public-private encryption key-files, but this is slight overkill when you're on a home LAN. SSH by default does not allow you to use a password as a command-line parameter, but there is another utility named sshpass which does.
> apt-get install sshpass
Now to log into OpenWRT you would issue a command like this.
> sshpass -p your_password ssh root@192.168.1.1
That however is a bad idea, because your plaintext password will show up not only in your bash history but also appears to anyone else on the computer who runs the ps command. The way to hide your password is to first copy your password to a file in a secure location (such as your profile directory). Here is the sequence of commands, including the new improved OpenWRT login command.
> echo your_password > ~/.openwrtpass & history -r
> sshpass -f ~/.openwrtpass ssh root@192.168.1.1
SSH is a very old and well known service which runs (by default) on port 22. OpenWRT has a particular SSH implementation called DropBear, which runs by default when you flash your router, and which only listens for connections from the LAN side, so DropBear is what we're connecting to when we run these SSH commands from our monitoring computer. SSH also has some very convenient functionality in that you can run any command you want on the remote host once the shell is established. Here is an example.
> sshpass -f ~/.openwrtpass ssh root@192.168.1.1 "tcpdump -s 0 -U -n -w - -i eth0"
When the above command is run from the monitoring computer, the tcpdump sub-command is executed on OpenWRT once the shell is established. If you ran the above command from the monitoring computer you would see the raw WAN packets output to your terminal (until you typed ctrl-c). Finally, you can pipe those raw WAN packets into wireshark for real-time analysis.
> sshpass -f ~/.openwrtpass ssh root@192.168.1.1 "tcpdump -s 0 -U -n -w - -i eth0" | wireshark -k -i - &
This is the kind of one-line functionality that could easily be added as a shell alias, or put into a .desktop shortcut file, or any other kind of shell launch utility you might be using. This also has the advantage of being a fully encrypted connection between the monitor and OpenWRT. For some good video instruction on using SSH here are several Hak5 sessions which I bookmarked. The first two cover much of the basic-intermediate stuff, and the last two are a little more advanced.
- SSH Forwarding: Local vs Remote with examples
- Maintaining Persistent SSH tunnels in Linux
- Explaining NAT Traversal with SSH proxies
- Setting up persistent reverse shells through relay proxies
-R. Foreman