Shell Launch Menus in Gnome3
February 13, 2017
Linux shares some of the same failings as MSWindows, in that it can be difficult to create menus, buttons, and icons for launching programs. Desktop icons in Linux are accomplished by creating a specific file, with a specific extension, containing specific lines of text, and placing it in a specific folder. Icons aren't too difficult. The Gnome Shell uses something called a desktop topbar (similar to the Macintosh), where the accepted approach to customization is via a so-called Shell Extension, and this very nearly requires a Computer Science degree to create one. I will outline my experiences in learning these techniques, and provide a template for creating a shell extension in Gnome3.
Debugging Gnome3 Extensions
Gnome provides some basic debugging capability through a program called lookingglass. One very useful tool I found to assist in debugging is an extension which opens lookingglass from the topbar, and it also restarts the gnome shell by right-clicking the button. These are two tasks that must be performed over and over as you are building a gnome extension. The utility extension I described here is called LGLoader. When running, the LGLoader button sits in the middle of the topbar, and displays as yellow text.

To install this, create a folder here.
/root/.local/share/gnome-shell/extensions/lgLoader@zhw2101024
Download all the extension files, and place them into that folder. Open the file metadata.json and add your shell's version number (you can find this by typing gnome-shell --version at a command terminal).
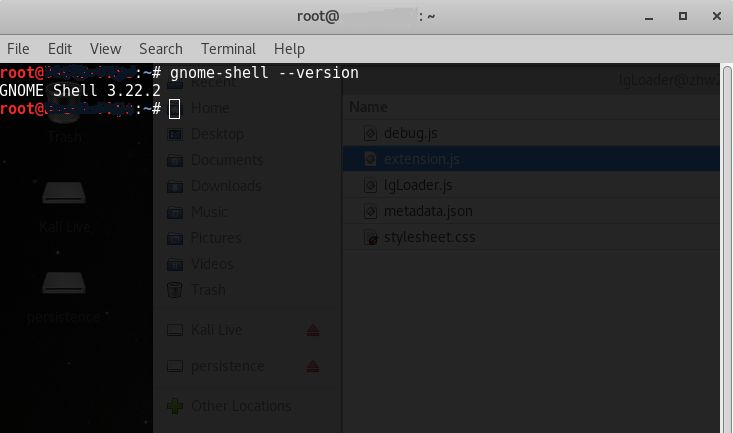
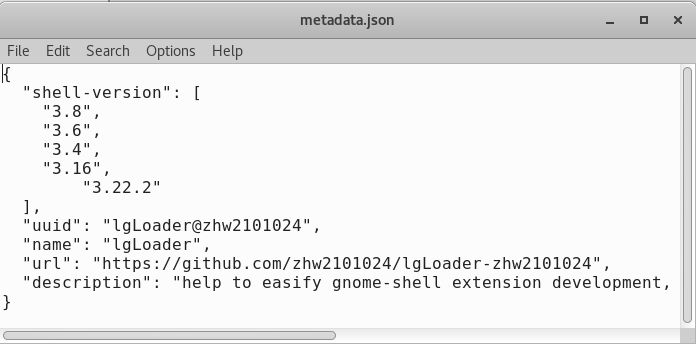
Close and save metadata.json , and then restart the gnome shell. The manual way to restart the gnome shell (when you don't have LGLoader available to you) is to type alt-F2 , type the 'r' key, and then hit enter. Once LGLoader is running, you can restart the gnome shell any time by just right-clicking on the button.
The final piece to the puzzle is to enable the extension. This can be done with something called the dconf editor (sort of like the registry editor in MSWindows). A far easier way to enable the extension is to install a program called gnome-tweak-tool.
> apt-get install gnome-tweak-tool
Launch the gnome-tweak-tool from a command line by uttering its name. Navigate to the Extensions tab, and use the button-sliders to enable or disable individual extensions.
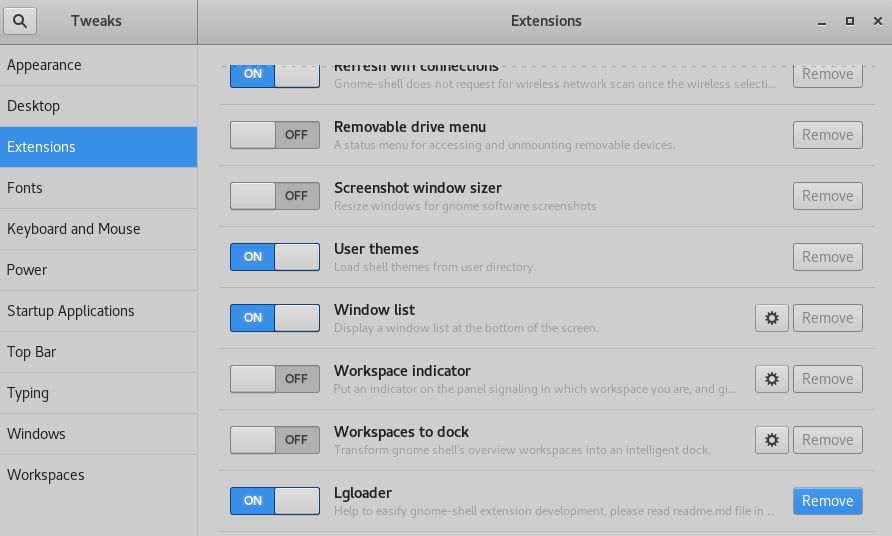
I found that a small correction to the original code for LGLoader was necessary to make it work properly. To correct the problem code, do the following. Open the file extension.js and find the section of code which appears as follows.
//let statusArea = Main.panel.statusArea;
for(name in statusArea) {
  statusEvents[name] = statusArea[name].menu.connect('open-state-changed', function(menu, isOpen) {
    statusArea.lgLoader.actor.can_focus = !isOpen;
  });
}
Replace the above code with the block appearing below.
//let statusArea = Main.panel.statusArea;
for(name in statusArea) {
  try  {
    statusEvents[name] = statusArea[name].menu.connect('open-state-changed', function(menu, isOpen) {
      statusArea.lgLoader.actor.can_focus = !isOpen;
    });
  }
  catch(TypeError) {
  }
}
Finally, restart the gnome shell, and the errant behavior will be corrected. I have made this fix and collected the LGLoader files into a single downloadable zip file, which you can find here. LGLoader is a highly useful utility for working with Gnome3 extensions, and is well worth the time taken to set it up.
Building a Gnome3 Extension
If you begin researching Gnome Shell extensions, you'll find a good deal of information. The documentation I found was spread over such a lengthy timeframe that it not only includes Gnome2 Panel applets (an older technology, from a prior version of Gnome), but it also displays classes and techniques which are either deprecated or have been removed altogether from the shell libraries. In short, the web documentation and help articles are kind of a mess. Rather than go into detail about things I've encountered, I will simply demonstrate the process for creating an extension, and then provide a working code-template for creating a topbar drop-down menu, and how to respond to menu-item clicks. Finally I'll talk briefly about the Gnome Shell libraries, and how to find documentation for the various objects and function calls.
The latest and greatest version of Gnome, the Gnome3 Shell, has a web-centric model. That is to say, it relies more heavily on new web-based technologies (such as javascript) than prior versions. As such, the paradigm used to create shell extensions is to build them using javascript. I suppose it's still possible to build a shell extension using an object-code language like C++, but I'm not personally aware of anyone who is doing it that way. The folks behind Gnome Shell have created a small program to build starter extensions, which is invoked like this.
> gnome-shell-extension-tool --create-extension
You will be prompted for some basic information, such as a name, description, and email address. Then the skeleton is created for you under this folder.
/root/.local/share/gnome-shell/extensions/yourextensionname
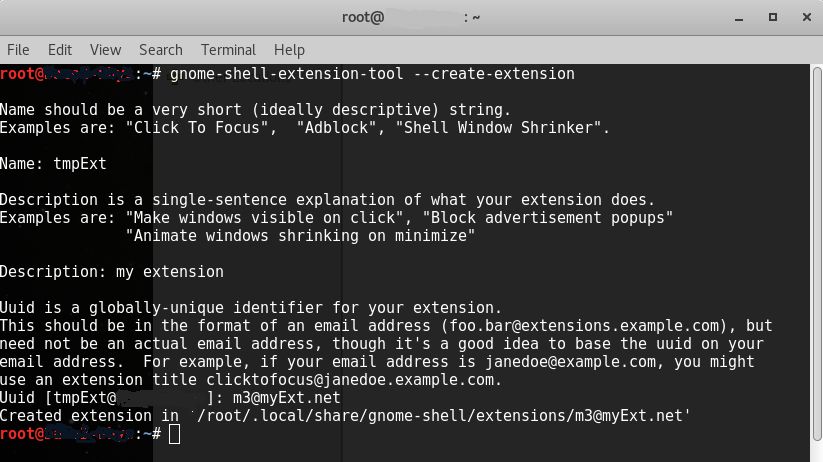
The create script will then open the file extension.js for you, so you may begin editing.
You can see quite a lot of example code over at https://extensions.gnome.org (here is one particular example project) , and you'll notice there are just slight differences in how they are set up, structurally. What has happened is that the javascript language has changed over time, and more code constructs have been added to the gnome libraries, allowing more advanced, higher-level functionality. Also, the Gnome Shell extension API has changed over time, so the interface calling convention is different depending on how old the extension is that you're looking at.
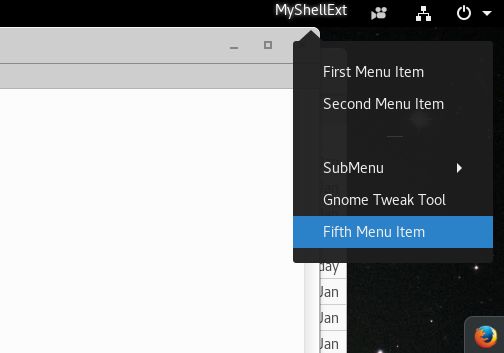
Here is the code template I arrived at, which I believe represents the most current standard for the Gnome3 extension.
const Main = imports.ui.main;
const Lang = imports.lang;
const PanelMenu = imports.ui.panelMenu;
const PopupMenu = imports.ui.popupMenu;
const St = imports.gi.St;
const Gio = imports.gi.Gio;
//const Gtk = imports.gi.Gtk;
const GLib = imports.gi.GLib;
const Clutter = imports.gi.Clutter;
const Shell = imports.gi.Shell;
const Util = imports.misc.util;

const MyPanelObject= new Lang.Class({
  Name: 'MyPanelObject',
  Extends: PanelMenu.Button,

  _init: function() {
    //Call the super-class
    this.parent(St.Align.START);

    //Add the label actor
    this.buttonText = new St.Label({ text: "MyShellExt" });
    this.actor.add_actor(this.buttonText);

    //Add first menu item, with action
    this.menu.addAction("First Menu Item", function(event) {
      Main.Util.trySpawnCommandLine('xdg-open https://extensions.gnome.org/');
    });

    //Add second menu item, with no action
    this.menu.addMenuItem(new PopupMenu.PopupMenuItem("Second Menu Item"));

    //Add a separator
    this.menu.addMenuItem(new PopupMenu.PopupSeparatorMenuItem());

    //Add a submenu as the 3rd item, and submenu item with no action
    this.MySubMenu = new PopupMenu.PopupSubMenuMenuItem("SubMenu");
    this.menu.addMenuItem(this.MySubMenu);
    this.MySubMenu.menu.addMenuItem(new PopupMenu.PopupMenuItem("submenu value"));

    //Add fourth menu item, with action
    this.menu.addAction("Gnome Tweak Tool", function(event) {
      let bashStr = "bash -c 'gnome-tweak-tool;bash'";
      Util.spawn(['gnome-terminal', '--tab', '--geometry=168x48+74+0', '--title=MyPC', '-e', bashStr, '--working-directory=/bin']);
    });

    //Add fifth menu item, with action. This works with external function _TermLaunch, but only if you call menuItem.connect separately.
    let menuItem = new PopupMenu.PopupMenuItem("Fifth Menu Item");
    let myruncmd = "cd /bin; ls -la";
    menuItem.connect('activate', Lang.bind(this, this._TermLaunch, myruncmd));
    this.menu.addMenuItem(menuItem);
  },

  _TermLaunch: function(actor, event, runcmd) {
    //Util.spawn(['gnome-terminal', '--tab', '--geometry=168x48+74+0', '--title=MyPC', '-e', "bash -c 'ls -la;bash'", '--working-directory=/bin']);
    Util.spawn(['gnome-terminal', '--tab', '--geometry=168x48+74+0', '--title=MyPC', '-e', "bash -c '"  + runcmd + ";bash'", '--working-directory=/bin']);
  }

});

function init()  {
}

let MyObject;

function enable()  {
  MyObject = new MyPanelObject();
  Main.panel.addToStatusArea('SamplePanelButton', MyObject);
}

function disable()  {
  if (MyObject) {
    MyObject.destroy();
    MyObject = null;
  }
}
init() is called once when the extension is added to the shell. enable() / disable() are called each time the extension is activated or deactivated by the user (for example, in the gnome-tweak-tool). The above example code shows 3 differents ways to launch terminals and run programs. It's a pretty straightforward file once you stop looking at the older variations. This is simple javascript, and about the most difficult task is finding decent documentation for the various objects and functions.
You can browse through source code for some of the installed Gnome3 components. For example, the application menu on the topbar is simply an extension located here.
/usr/share/gnome-shell/extensions/apps-menu@gnome-shell-extensions.gcampax.github.com
Documentation for Gnome3 Extensions
With regard to finding documentation for the various classes, global variables, and functions, this is where things get more bizarre and difficult. Part of the Gnome libraries exist as javascript, and part of them are compiled (C or C++) object code. Wherever you see the acronym GJS, you should imagine that code existing as javascript. When you see the term GIR you should imagine XML files which reference C-language functions that are callable from javascript.
You'll find a lot of information at the Gnome developer wiki. However much of it doesn't apply to shell extensions, and when you do finally drill down to function and class references which are used by extensions, you'll find they use C-language representation, and often the names are slightly different than what you use in practice. Some of the best information can be gotten from the source code itself. Prior to Gnome 3.12 all the javascript source files were installed on the system as individual files, but after that version these files were wrapped up into a shared library (two or more in fact). Here are two shared libraries that I am aware of which contain this javascript source code.
/usr/lib/gnome-shell/libgnome-shell.so
/usr/lib/libgjs.so.0
If you wish to extract the source files, I have written a BASH script to do that. Open a terminal and execute this script.
#!/bin/sh

gs=/usr/lib/gnome-shell/libgnome-shell.so

mkdir $HOME/Downloads/gnome-shell-js
cd $HOME/Downloads/gnome-shell-js

mkdir -p ui/components ui/status misc perf portalHelper extensionPrefs gdm

for r in `gresource list $gs`; do
  gresource extract $gs $r > ${r#/org/gnome/shell/}
done

gjs=/usr/lib/libgjs.so.0
mkdir -p modules/overrides modules/tweener

for r in `gresource list $gjs`; do
  gresource extract $gjs $r > ${r#/org/gnome/gjs/}
done
The resulting collection of javascript files will get you maybe 80% of the references you will need to do most common kinds of programming, but it's really difficult for me to say for sure. Much of GLib, GIO, and GObject is still C-language source code. Here is another reference put together a couple years ago, which provides a (nearly complete) set of API references. I'm sure I'll provide more example code over time, but this is enough to put up a topbar menu for launching programs.
-R. Foreman